Constructing a Kenya Top Bar Hive
There are different types of hives used in beekeeping in Kenya but the most important for commercial purposes are two, the Kenya Top Bar Hive (KTBH) and the Langstroth hives. Others are the Log hives made from hollowed out tree trunks, basket hives made from woven sticks which are smeared with mud, and pot hives made of clay that are only used for small scale honey production.
Constructing a Langstroth hive is more complicated and may not be the best option for beginners in beekeeping. Those experienced in beekeeping can purchase a Langstroth hive. This article is intended for those wanting to construct a modern beehive like KTBH.
KTBH was developed in Kenya and is a good option for many Kenyan beekeepers. The main advantage is the simplicity of the hive and its low cost. You also get to produce beautiful comb honey for home consumption or for sale.
The KTBH has three basic components, i.e. the body, top bars and the roof. Keep in mind to follow the measurements and in particular for the top bars!
Plywood Preparation
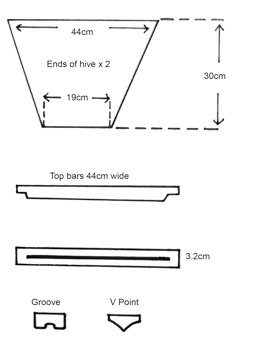
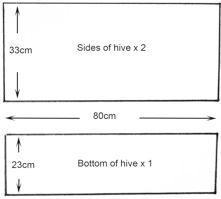
You can use whatever timber tthat is cheap and available locally. Pine, Cyprus, Grevillia robusta can be nailed together so long as it is not warped. However the ideal wood to use for the body is 9mm plywood as it can be sawed quickly and nailed easily into the shapes needed. Follow the dimensions below to cut out each side of the beehive.The 44cm long top bars should be cut from strips of natural wood. Cedar or Grevillia robusta are both good choices. The only critical measurement is that the top bars must be 3.2cm wide. Either grooves or points can be carved to encourage the bees to lay down wax.
Construction of beehive
Before you glue and nail the pieces of plywood together, sand down the edges to ensure a smooth surface and to prevent getting splinters while you work. Using simple wood glue to seal the pieces of plywood together will help prevent ants and insects from crawling into the hive.
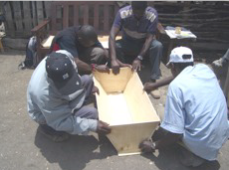 Once glued, nail the pieces of the beehive together using plenty of 1inch nails.
For the front end of the hive, nail the plywood front piece 2cm back into the hive leaving a small lip at the front. This gives the bees a place to rest or pause at the entrance to the hive. Queen Excluder
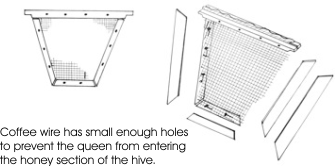
Saw one top bar in half (long ways) and nail a piece of coffee wire in between the two halves. Using either top bar wood or small strips of left-over plywood, fashion the remaining structure of the queen excluder to fit the inside of the tapered beehive.
The coffee wire should be tightly nailed between the wooden strips and should fit snugly inside the beehive.
Fitting the Queen Excluder
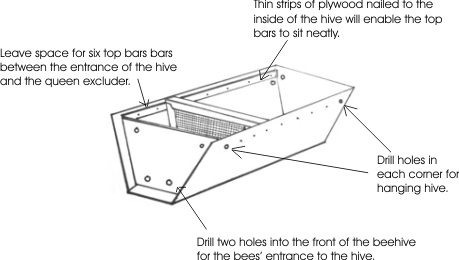 The queen excluder should be held in place six top bars back from the entrance of the hive. Thin strips of left over plywood should be nailed length-wise down the side of the hive leaving a 3.2cm gap for the queen excluder to slide into place. Ideally the queen excluder should be removable but you may need a small nail to hold it in place flush against the bottom and sides of the hive. The long strips of wood will become a ledge enabling the top bars to sit neatly inside the hive.
Top Bars and Roof
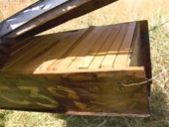 The top bars are the only part of the beehive that has to be accurately measured. The bars need to be exactly 3.2cm wide which is the proven distance apart that bees like to make their comb. This includes a small gap that the bees leave which helps them to pass between combs to both deposit wax and feed the brood. You may find it worth the investment to get these thin strips of top bars cut with an industrial saw machine. If you don’t manage to cut the top bars exactly to 3.2cm the bees tend to lay down their wax combs over the join of the top bars. This isn’t a disaster; it just means that you’ll find it harder to harvest honey as several top bars will get ‘stuck together’.
Sealing the hive
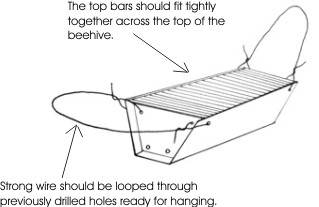 Fitting the top bars into the hive should create a sealed chamber beneath. This will help you during harvesting, as bees should only be able to escape from the top bar gap that you lift out. If you have spare wood you can cut and place a flat piece of plywood over the top of the top bars to create a ‘lid’ but it’s not essential.
The Roof
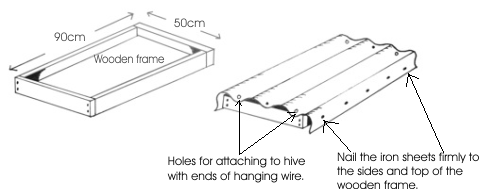
A waterproof roof is essential to keep the bees dry. Corrugated iron sheets are ideal for this as the water flows off the roof and away from the hive. You need to make the roof wider and longer than the hive so that the hive is totally protected from the rain. If you buy 3x1m iron sheets you can roof 4.5 beehives if you cut each roof sheet into 1m x 65cm strips.


Comments
The alternative to plywood would be ordinary timber but this would make it expensive, heavy and a bit difficult to construct.
As for the top bar, you cannot use plywood because the width does not allow for the drilling of grooves. This you can do only on solid timber.
RSS feed for comments to this post