

A bee shed—sometimes called a bee house—is more than just a shelter. It’s a place where you can manage colonies in a controlled environment, shield them from harsh weather, and keep them safe from curious humans or wandering animals. Unlike traditional open-air setups, a shed brings stability to the apiary and makes day-to-day operations far more efficient. The trick is to enclose the space while still allowing bees to fly freely in and out.
Choosing the Spot
My farm had been idle for years, covered in acacia trees, bushes, and shrubs. The nearest homestead was about 300 meters away, though neighbours occasionally sneaked in to graze their livestock. That quiet, hidden space—away from traffic but open to the morning sun—seemed perfect for an apiary. I also figured the presence of bees might discourage those sneaky grazers.
At first, I planned for 40 hives. But after thinking about future expansion, I doubled the number to 100. Building one large structure made more sense than adding smaller ones later—it would save money and effort in the long run.
Designing the Shed
The shed ended up being 64 feet long and 24 feet wide. Around it, I built a two-foot-wide concrete channel, set two feet away from the walls. On one end, I added an 8-by-8-foot storage room for tools and equipment.
The walls are mostly chain link fastened to blue gum posts, except for the windward side and the storage room, which are reinforced with timber off-cuts. The roof is corrugated iron sheets, while the floor is simply earth, sloping gently for good drainage. Inside, four rows of raised stands hold the hives, with walkways in between for easy access.
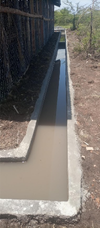
Spacing was important: each hive sits three feet apart, giving enough room for movement and reducing stress on the colonies. The surrounding channel collects rainwater, which the bees use, while also cooling the environment and keeping out rodents and crawling insects like ants. The chain link walls allow bees to move freely but keep out larger intruders.
Materials
Here’s a snapshot of what went into construction:
- Cement (ordinary and waterproof)
- Ballast, sand, bricks, hardcore, and marram
- Round poles and treated timber in various sizes
- Nails of different lengths, roofing nails, and U-nails
- Corrugated iron sheets, ridges, and off-cuts
- PVC gutters, brackets, stoppers, elbows, and pipes
- Preservatives, insecticide, and whitewash
I wrestled with the idea of “locally available materials.” Was thatching grass from the farm more “local” than iron sheets from the hardware store? Was timber bought cheaply from afar less “local” than timber from a nearby vendor? In the end, I realized the definition is flexible—it depends on cost, convenience, and durability.
Building the Structure
The process began with clearing vegetation and debris. Post holes were dug two feet deep, spaced four feet apart, and treated with insecticide to protect the poles from ants and termites. After inserting the treated poles, I poured concrete to reinforce them.
The floor was raised slightly above ground level to prevent moisture buildup. Once the poles were upright, I connected them with treated timber, added side planks, and mounted the roof. Fastening the chain link went on next, followed by the brick-and-mortar channel around the shed.
Important to note:
- Hive stands keep hives off the ground, safe from dampness and pests.
- A lockable door add security.
- Storage room for tools, suits, and smokers.
- Walkways make access easier.
- Gutters and drainage prevent flooding.
Lessons Learned
One thing I discovered: the people you hire—carpenters and masons, or “fundis”—can make or break your project. Choose wisely. My own experience with them is a story for another day.
But in the end, the bee shed stood strong: spacious, practical, and ready for 100 hives. It’s proof that with careful planning, smart use of materials, and a little patience, you can turn an idle farm corner into a thriving apiary. Share your experience how you constructed a farm structure.